How To ... Print
Originally printing was supported in two main ways: character printing where characters were sent to the printer one by one directly - PRINT "Hello world" would just send the eleven ASCII characters followed by a carriage return (CR) and line feed (LF). Printing could be turned on by a control character (e.g. VDU 2 or Control-B) and then characters sent to the screen would also go to the printer. Character printing is no longer supported.
A printer manager (called !Printers) now controls the printer interface and sends a graphical image of each whole page, one by one, to the printer. Applications offer a printing option which uses similar routines (provided by the Operating System) to those that show an image on the screen. Whereas the screen is nominally 90 dots per inch (90dpi), printers will usually be between 300 dpi and 1200 dpi. Modern printers no longer offer a parallel port connection, neither do modern computers. Generally printers will be connected either by USB (most cheaper printers) or by network (either with a better-specified printer or via a print box). The !Printers application needs to be told how the printer is connected and what paper size and resolution it uses by default (the application can over-ride this). Each printer is shown on the icon bar and the one to be used as the current printer can be chosen.
There are two main steps to setting up a new printer. If you double-click on the !Printers icon inside 'Apps' and then click MENU over the icon bar icon and SELECT the option 'Install new printer' then you can identify your printer type. This opens the directory 'PrintDefs:' (printer definitions understood by RISC OS and held within the !Boot directory) showing the various printer manufacturers and popular printer models. This selects the PCL (printer command language) such as PCL6 (HP Laserjet 4) or ESC/P (Epson Standard Code for Printers) and the feature list for the printer. This will show the printer icon on the icon bar. Initially the 'parallel printer' connection is assumed.
The next step is to click MENU over the newly installed printer icon and select 'Printer Control'. Then click MENU over the printer name you want to set up and select 'Connection'. This will show the window below:
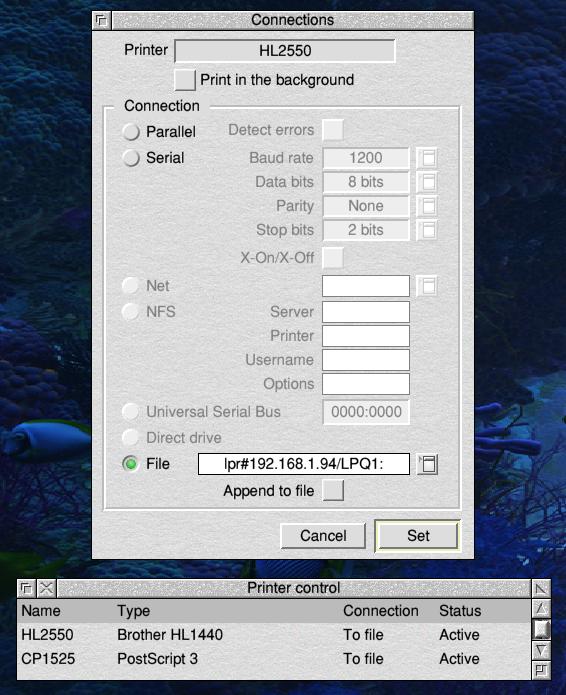
Ensure the printer you want to install is switched on and connected. Download the 'Network Printer Drivers' software from !Store and install it. This will provide a pipe 'lpr' for network printer communication. Note the static network address of your printer and the name of its lpr queue. You should then set printing 'To file' with a filename of 'lpr#192.168.1.94/LPQ1:' where the IP address is that of the printer follwed by '/' then the lpr queue name [which must be no more than 8 alphanumeric characters] followed by ':'. Now click 'Set' and then 'Save choices'. This will set !Printers up to print to a file in the Scrap directory and install an lpr device driver in !Boot.Choices.Boot.PreDesk that will see the created print job(s) and send it(them) to the printer.
There are some applications, such as !PDFMaker, which will contain the necessary installation instructions and will set up !Printers to print to a file as the desired output rather than send the information to an actual printer. For a USB-connected printer things can get more complicated. You may need to work out how to describe your printer to the system by interpreting the following commands:
*usbdevices
No. Bus Dev Class Description
  1   1   1  9/ 0 EHCI root hub
  2   1   2  9/ 0 Genesys Logic USB2.0 Hub
  3   1   3  0/ 0 Chicony USB Keyboard
  4   1   4  0/ 0 Genius Optical Mouse
  5   2   1  9/ 0 NEC OHCI Root Hub
  6   2   2  0/ 0   8-in-2
  7   3   1  9/ 0 NEC OHCI Root Hub
  8   3   2  0/ 0 Lucent USS-720 evaluation kit
*usbdevinfo 8
USB release     : 0100
Device class    : 00
Device subclass : 00
Device protocol : 00
Max packet size : 08
Vendor ID       : 047E
Product ID      : 1001
Device ID       : 0104
Manufacturer    : ''
Product         : ''
Serial number   : ''
# of configs    : 1
*If this looks a bit daunting then GutenPrint is available on the RISC OS Open Ltd. 'NutPi' SD card and can save a lot of grief. There is also !PrintPDF which is included in the Raspberry Pi SD card image and can be downloaded from here.
With the relevant printer selected, printed output from an application should now be directed to that printer.